[SOLVED] How to set up FBX to expose personal Open WebUI server on LAN to internet?

Hey All, I’m needing help to (hopefully) expose my personal Open WebUI server on my LAN to the internet, preferably through my self hosted FreedomBox personal domain (thegeekden.net), so I can access it while I’m away from home.
Problem Description
In my current network setup, my FBX is behind my ADSL modem/router with LAN IP of 192.168.10 (static). My Open WebUI server (192.168.0.12) is a separate host on the same network (LAN), and is also addressed as a static IP. I have port forwarding on the ADSL modem/router enabled for the following ports to my FBX: 80, and 443.

Notes: I use the WordPress installation on FBX as my internet facing page for my domain, FWIW. I have my FBX set up for SSL using Let’s Encrypt, and that works great. However, my Open WebUI server is not set up for SSL, it serves the Open WebUI web interface at http://192.168.0.12:3000, and I’m wondering if the SSL for this can use the FBX Let’s Encrypt for SSL, or do I have to separately set that up as well?

I want to expose my OpenWebUI server on my lan (http://192.168.0.12:3000) to the internet at https://thegeekden.net:3000, or https://thegeekden.net/owui/.

How do I accomplish this?

Expected Results

  1. When I visit https://thegeekden.net, I see my FBX WordPress front page as I normally do now.
  2. When I visit https://thegeekden.net:3000, or https://thegeekden.net/owui from the internet, I will see the login page for my Open WebUI server.
    Actual results
    I have not gotten there yet, I am trying to figure out how to do this correctly, and securely.

Information

Here is a guide to forwarding requests to a server on local LAN from FreedomBox.

Goal

  • You have a FreedomBox running with a working domain already setup. You are able to access your FreedomBox using a URL such as https://www.mysite.example/ .
  • You have a different server running a local service on LAN that you wish to expose to the Internet on the same domain as your FredomBox. The local service must be a web service using the HTTP protocol (it is also possible to setup non-HTTP service, but that is a different approach). Optionally, you can have special domain assigned specifically for this local service.
  • You wish for FreedomBox to handle the TLS certificates for this domain as FreedomBox typically does. Your local service need not setup and manage TLS certificates.
  • Optionally, you may want to limit access to local service using FreedomBox credentials. Only users with a FreedomBox account (and belonging to a chosen group) will be able to access this service. The local service will not be available to general public on the Internet. This way you can host local services that don’t implement their own authentication or local services with their own authentication mechanisms disabled.

Exposing Local LAN servers to Internet using FreedomBox

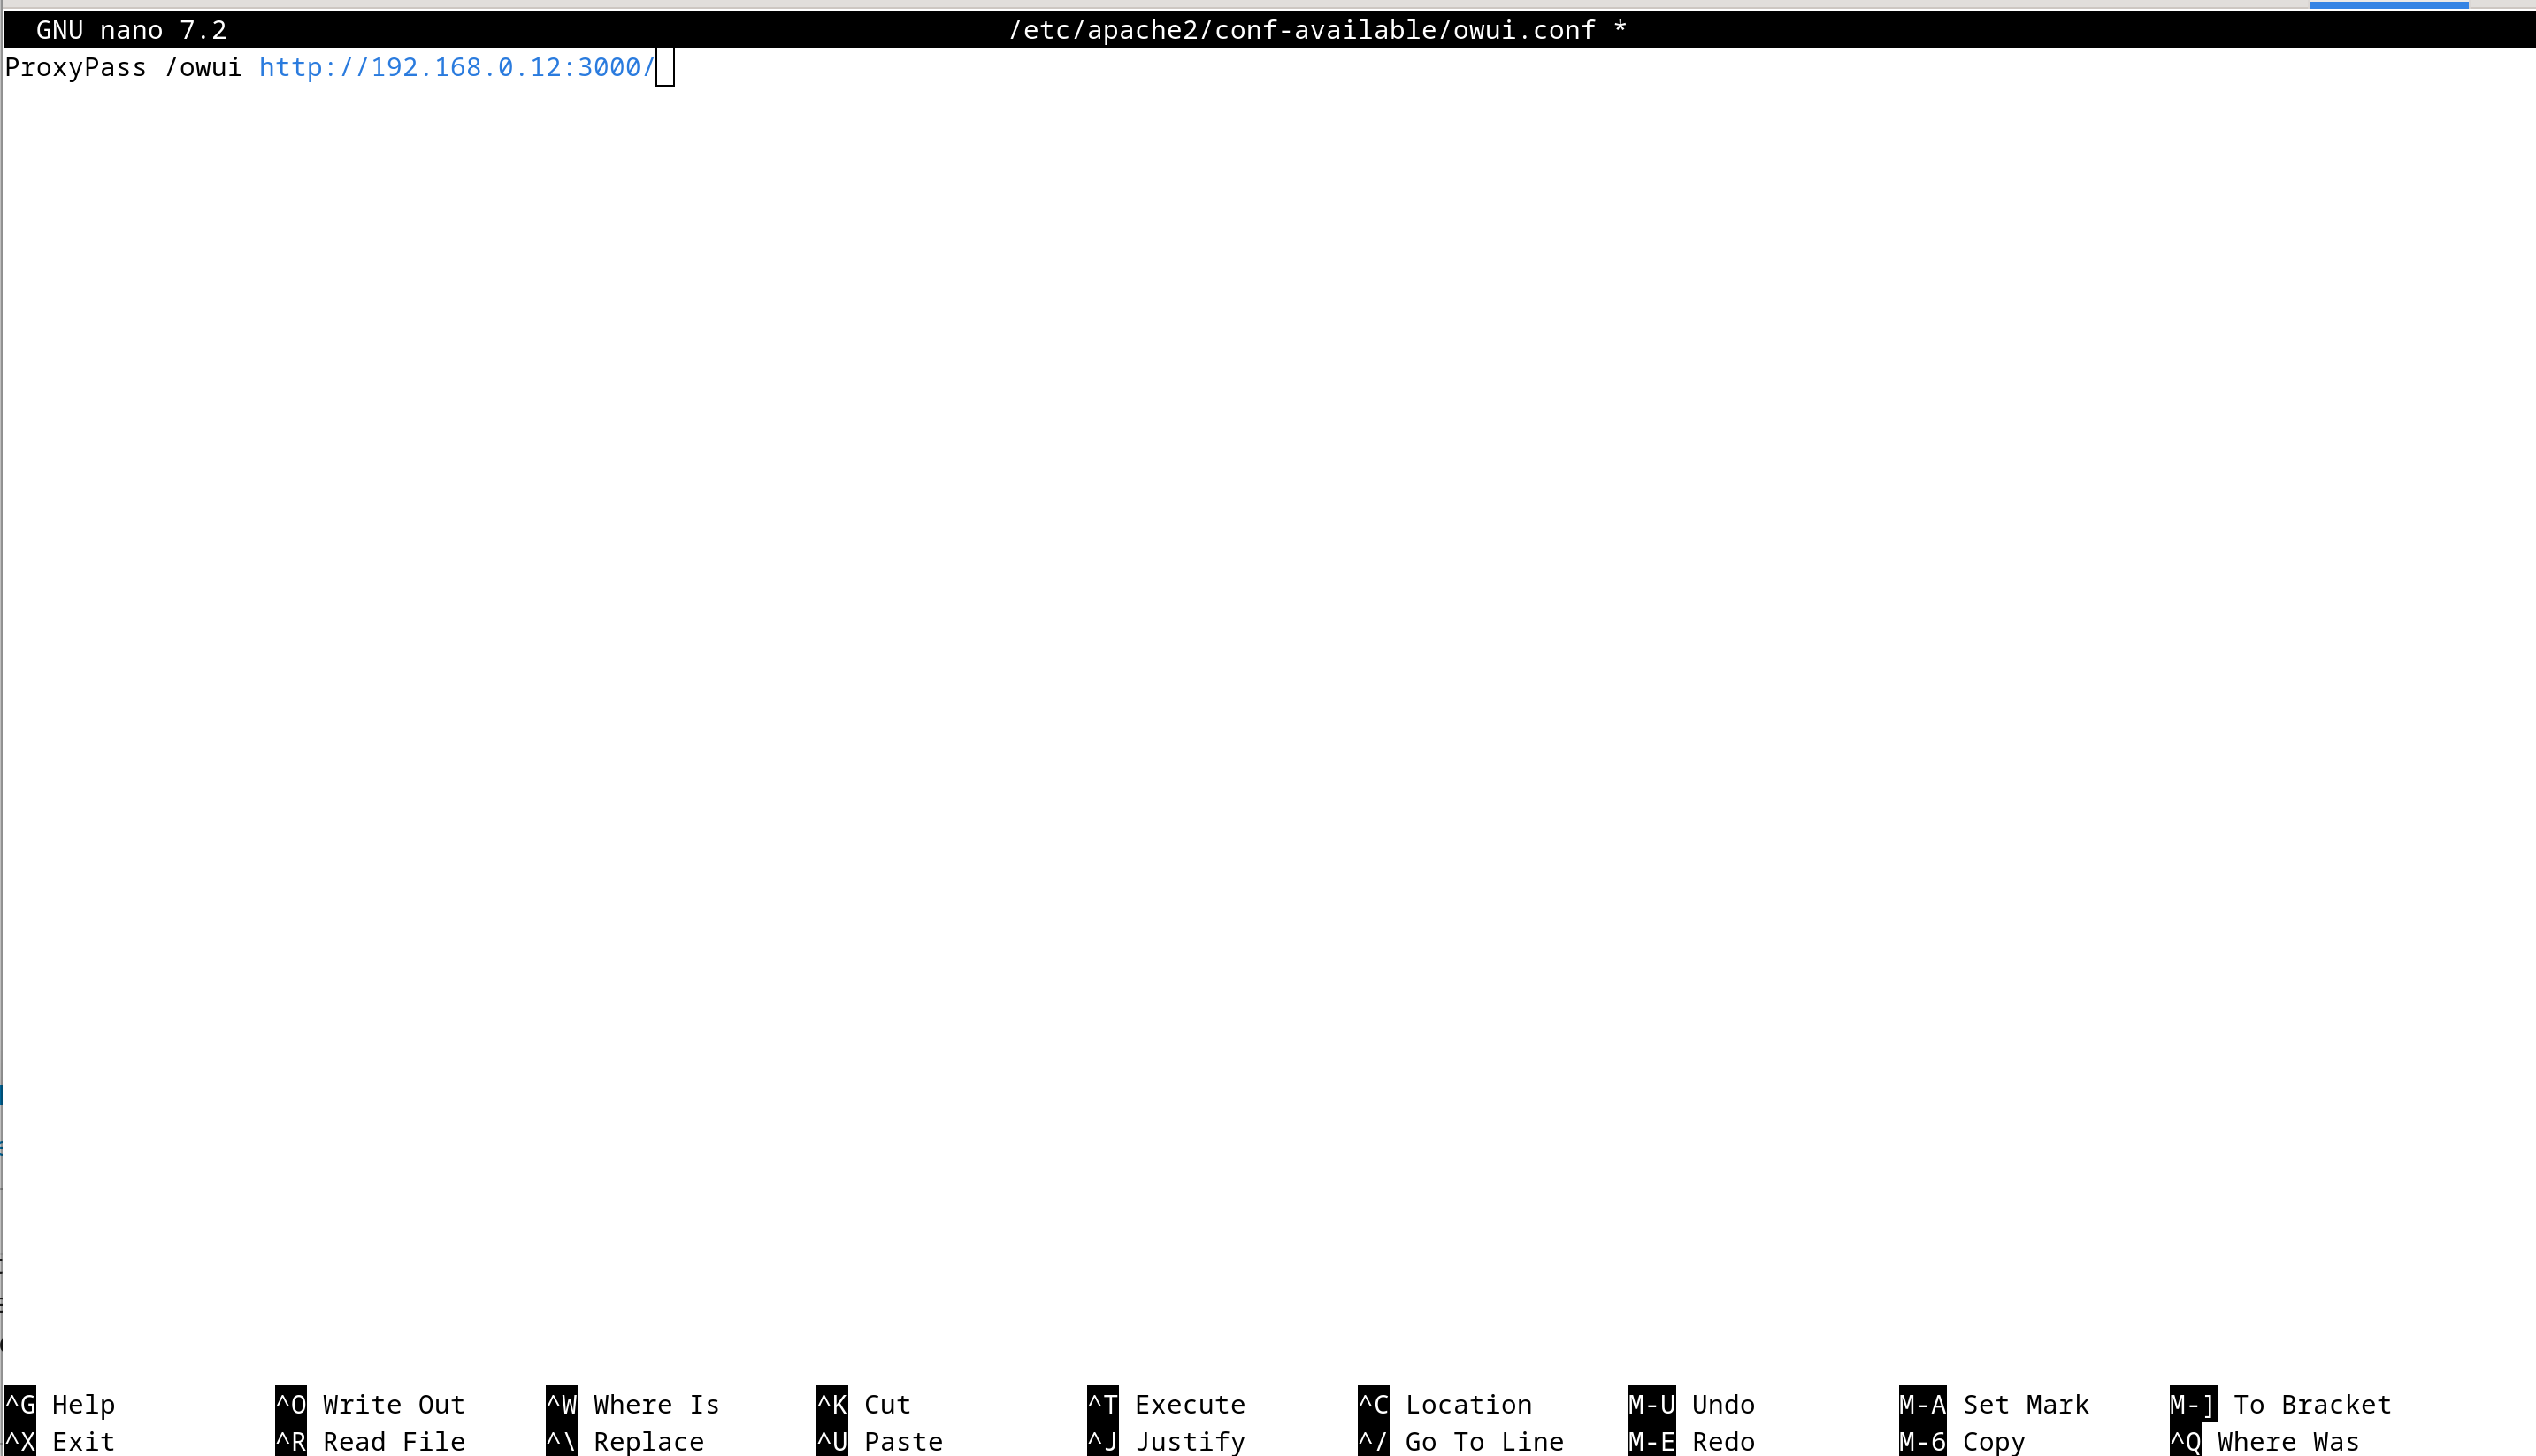
  1. To expose the service, create an Apache configuration file in /etc/apache2/conf-available/ and write a ProxyPass directive. Assuming your local service is running on a computer with IP address 192.168.0.20 on port 3000, you can do this by running a command (as a root user on the terminal):
cat > /etc/apache2/conf-available/my-local-service.conf <<EOL
ProxyPass /myservice http://192.168.0.20:3000/
EOL
  1. Then, enable this Apache configuration. Run the following command:
a2enconf my-local-service
  1. Then reload Apache web server.
systemctl reload apache2

You can now access your local service at the following URL https://www.mysite.example/myservice/ . Note that the URL is a secure URL with https://. The certificates will be managed by FreedomBox/Let’s Encrypt. All your other apps and services work as usual. You can add any number services you want this way.

Running the Service on FreedomBox Itself

The above approach will also work if the local service is running on FreedomBox itself. In this case, the ProxyPass directive in the configuration should be modified to look like ProxyPass /myservice http://127.0.0.1:3000/.

Disabling the service

To disable exposing the local service:

  1. Disable the Apache configuration file.
a2disconf my-local-service
  1. Then, reload Apache web server.
systemctl reload apache2

Adding Authentication

You can configure the service to be available to only users with FreedomBox account. This is a good choice if:

  • The local service that is exposed to the Internet should not be available to everyone. And,
  • The local service does not provide its own authentication mechanism. Or,
  • The local service provides it’s own authentication but you don’t want to maintain a different set of user accounts for that service and want to reuse your FreedomBox user accounts.
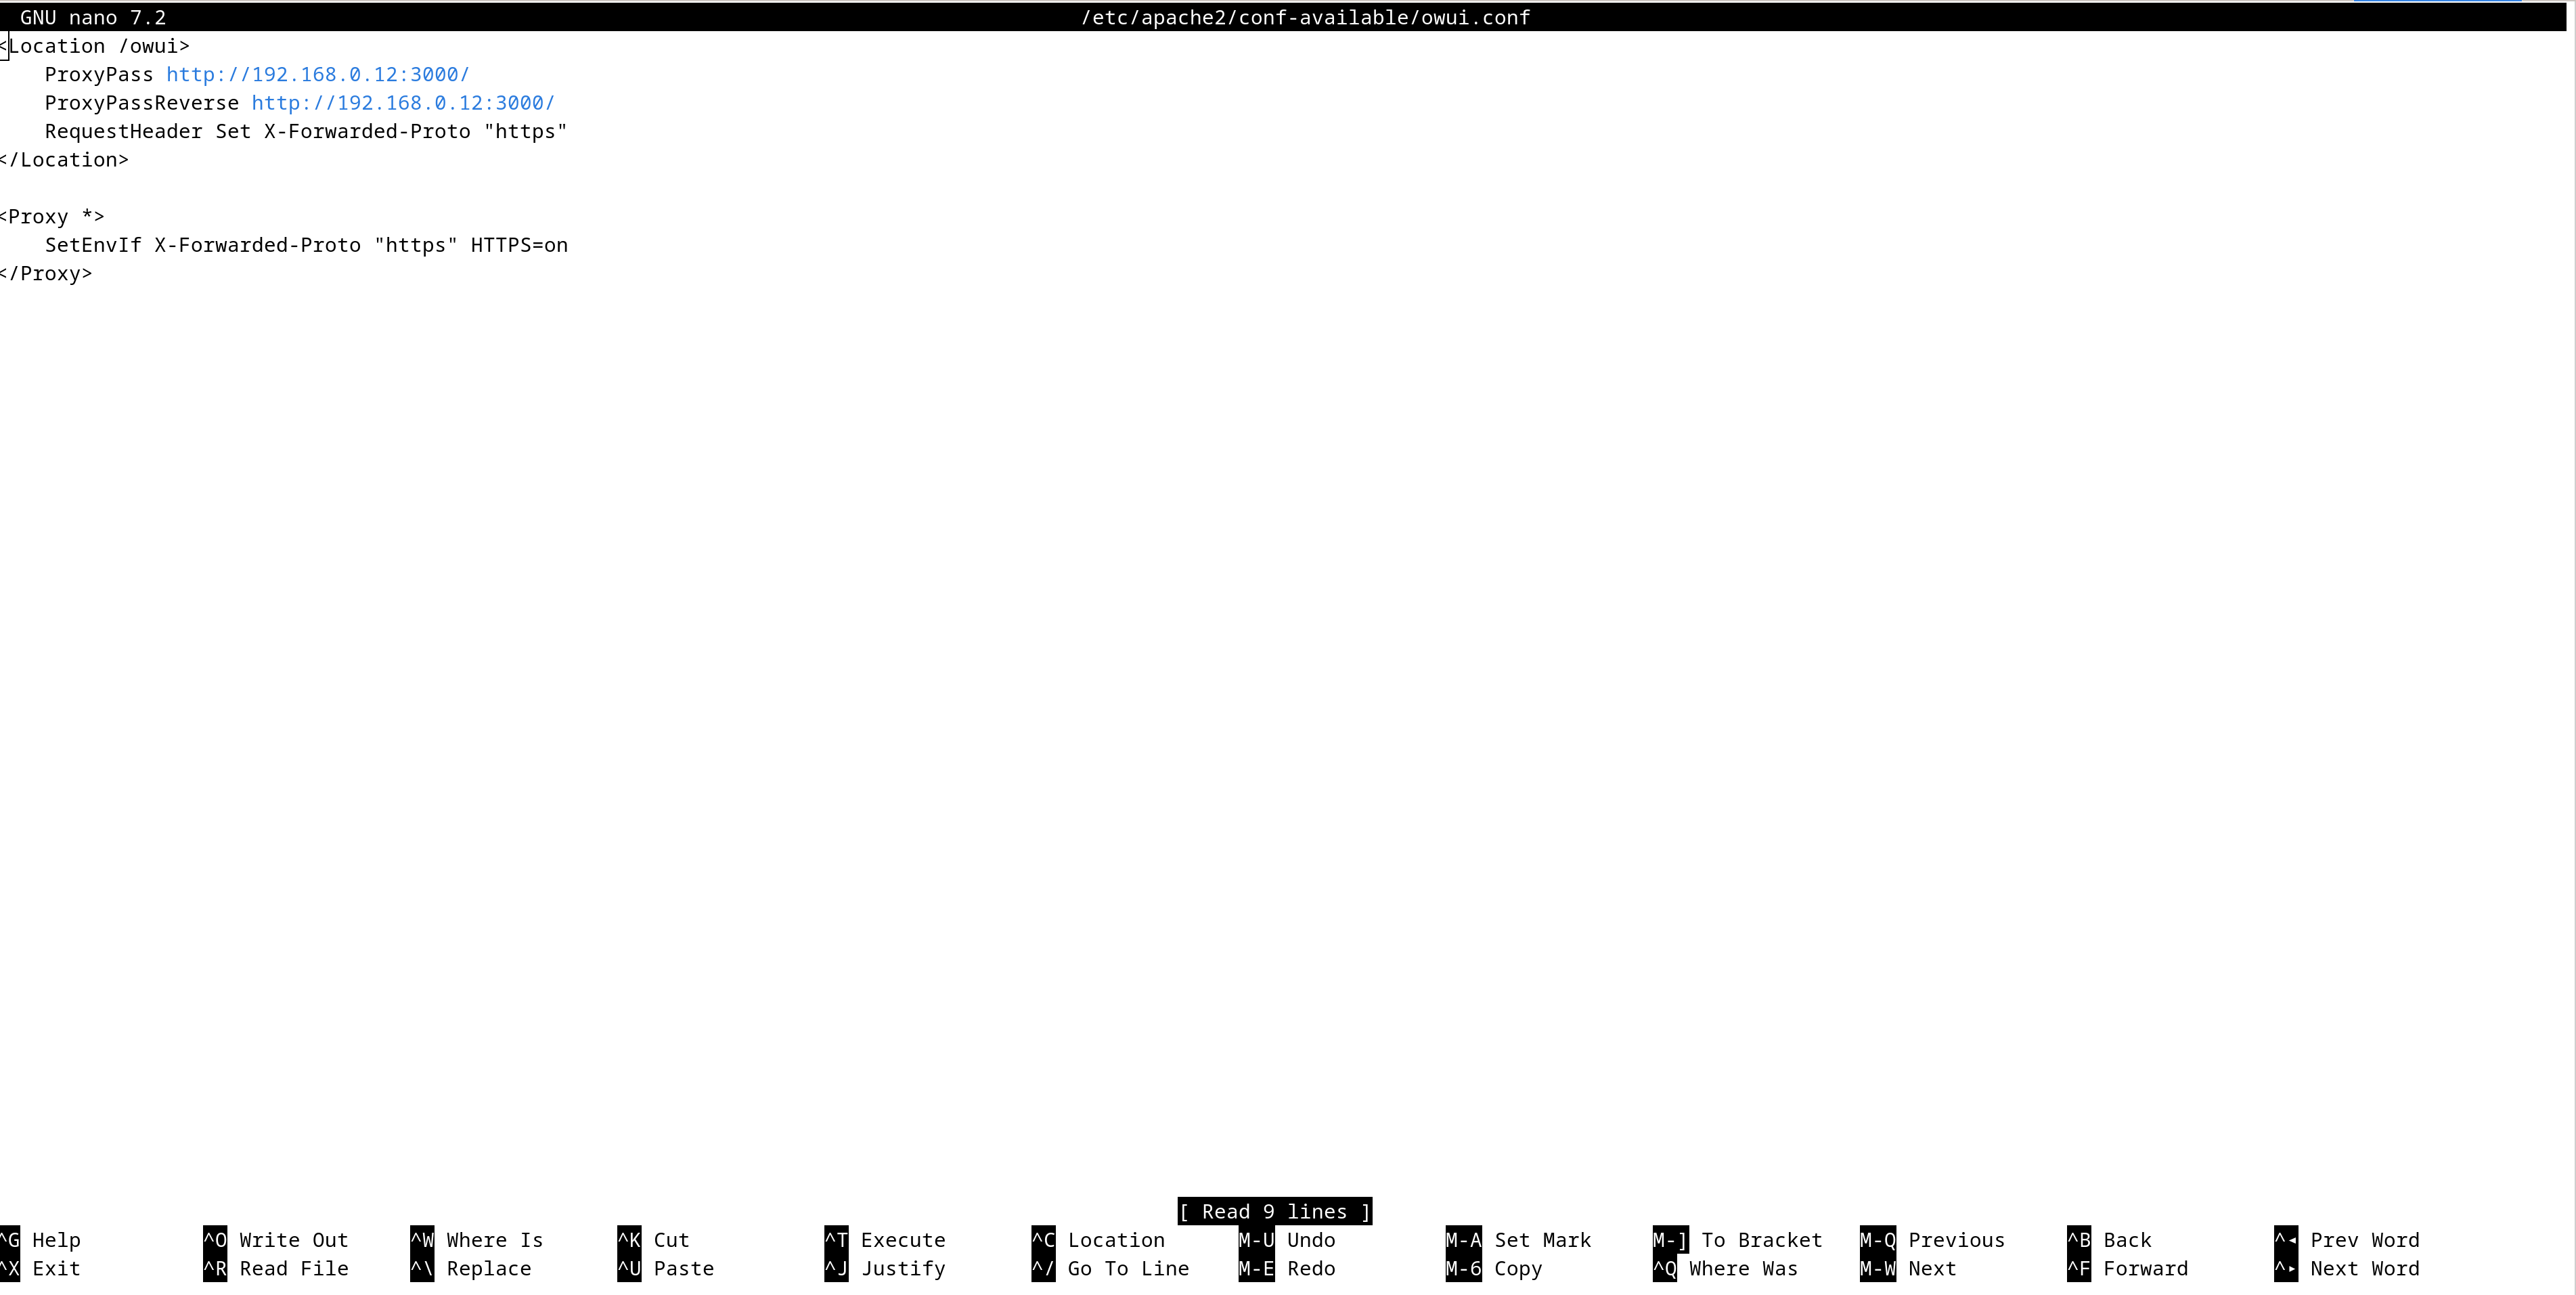
  1. Update the Apache configuration file /etc/apache2/conf-available/my-local-service.conf to look like the following.
<Location /myservice/>
    Include includes/freedombox-single-sign-on.conf

    ProxyPass http://192.168.0.20:3000/
</Location>
  1. Then, reload Apache web server.
systemctl reload apache2

If you wish for only some groups of users to be able to access the service, another change to the configuration is needed. Make the configuration look like the following if you wish to allow users of “web-search” group and also users of “admin” group to access the local service. All other users even if they have a valid FreedomBox account will be denied access.

<Location /myservice/>
    Include includes/freedombox-single-sign-on.conf

    <IfModule mod_auth_pubtkt.c>
        TKTAuthToken "web-search" "admin"
    </IfModule>

    ProxyPass http://192.168.0.20:3000/
</Location>

Hosting the Service on a Separate Domain

Some services and web applications hosted under a URL fragment such as /myservice/ do not work well. They require an entire domain or subdomain to be dedicated to them. In these cases too, FreedomBox can expose local services.

  1. First acquire a domain or a subdomain.
    • If your domain is a custom domain that you own, go to the DNS settings on your domain name provider and add a subdomain. You can create a CNAME record that simply points to the main domain.
    • If you are using FreedomBox Dynamic DNS service, then login into https://ddns.freedombox.org and enable the “Wildcard” option.
  2. Add the new domain into FreedomBox. Goto System → Name Services → Domain (regular) → Add. For example, add myservice.mysite.example.
  3. Then create an Apache configuration file at /etc/apache2/includes/<domainname>-include.conf. For our example this is: /etc/apache2/includes/myservice.mysite.example-include.conf. The contents of the file should be:
ProxyPass / http://192.168.0.20:3000/
  1. Modify the above file for authentication if necessary by adding the Include and <IfModule> configuration directives as shown in the authentication section above.

Troubleshooting

When your setup does not work as expected, to debug, run a temporary web service on your FreedomBox.

  1. Create a temporary directory with an index.html page on the FreedomBox.
mkdir temp
cd temp
cat > index.html <<EOL
<!DOCTYPE html>
<html>
  <head>
    <title>My test page</title>
  </head>
  <body>
    <h1>Hello, World!</h1>
  </body>
</html>
EOL
  1. Run a temporary web server (press Control-C to terminate):
python3 -m http.server 3000
  1. Update the Apache configuration to point to this temporary service on FreedomBox.
ProxyPass /myservice http://127.0.0.1:3000/

Extras

There are many additional features that Apache can provide to improve the local service. For these, explore Apache documentation. Some features include:

  • Serving static files such as JS, CSS, and media files from local directory without invoking the local service to improve performance.
  • Caching the responses from the local service to improve performance.
  • Setting additional headers for security, cache control, etc.
  • Modify the HTTP header responses from the service when it does not work well to hosting under a URL fragment such as /myservice/.
  • Perform redirects from http:// URL to https:// and setting HSTS header.
  • Load balancing among multiple local services for high availability, scaling, etc.
  • And more.
2 Likes

TY Sunil! I’ll give it a try and let you know how it does! :slight_smile:

So, it works - sort of. I followed the “Exposing Local LAN servers to Internet using FreedomBox” portion of the directions to test basic functionality first.
I think there might be something about the way that apache2 reverse proxies the Open WebUI (/owui, in my case) that “clips” some of the functionality of what is being “served up” by my Open WebUI server.

Here are some pics to show what I’m getting in my web browser:
This is what I get when I navigate to my “external” owui site address -


And this is from my LAN address - this is what it “should” look like:
Please note that when I navigate to the external version of my owui, it does not have the same redirect in the address that the internally served one does, so I think that part is somehow not being forwarded by the apache2 reverse proxy.

Here is what my /etc/apache2/conf-available/owui.conf looks like on my FreedomBox:

Any ideas on what to do to fix this?

Note: The Open WebUI server has it’s own authentication, so for the time being, and just to keep this as simple as possible for now, I will have it handle authentication. Thanks for replies in advance! :slight_smile:

Update: I’m going to try the Hosting the Service on a Separate Domain portion of the directions above to see if that fixes things, but in the meanwhile, feel free to make suggestions to help!

Update 2: Ok, after reading my registrar’s knowledgebase article regarding this - please see: https://www.namecheap.com/support/knowledgebase/article.aspx/579/2237/which-record-type-option-should-i-choose-for-the-information-im-about-to-enter/, I am now completely confused as to how to handle this “seemingly simple” request for functionality.
Advice here would be GREATLY appreciated.

Update 3: Well, I attempted the following things:

  1. I changed the apache2 config to look like this:
  2. Verified apache2 proxy and reverse proxy were installed and enabled.
  3. Checked all logs related to this in Cockpit, with Priority:debug&above enabled - I could see that apache2 is serving the images from /owui, but no errors. I can post a BePasty log dump if anyone wants to see it.

Sunil, TYVM for reply, I just saw your message notification, and will follow your advice. I’ll report back on my findings as I progress with this - I hope that it may help other FBX/OWUI users.

From a quick peek at the documentation, it looks like Open WebUI does not support being hosted on a URL path fragment like /owui. You will need to try to the Hosting the Service on a Separate Domain approach.

For adding a subdomain in Namecheap, go to administration console and add a CNAME record. For creating a subdomain owui.thegeekden.net, the following are the DNS record values:

  • Type: CNAME Record
  • Host: owui
  • Value: thegeekden.net
  • TTL: leave default
1 Like

TY, I’ll do that next. Quick question: Does that mean that I will have to set up SSL separately for the subdomain owui.thegeekden.net? And I’m guessing that the port forwarding for owui.thegeekden.net would be from external firewall:3000 to 192.168.0.12:3000?

So, I followed your directions regarding DNS and got the subdomain set up for owui.thegeekden.net with my DNS provider. I enabled the owui subdomain in FBX System/Name Services. I also have a Let’s Encrypt certificate in FBX System/Let’s Encrypt for the owui.thegeekden.net domain. Then I wrote this code to my /etc/apache2/sites-available/owui.thegeekden.net.conf: Bepasty, which got replaced by FBX with this: Use FreedomBoxTLSSiteMacro owui.thegeekden.net.
So, when I navigate to https://owui.thegeekden.net/, I get the FreedomBox front page.
I was expecting it to go to the Open WebUI login page but it did not. Can you suggest how to fix this?

Then I wrote this code to my /etc/apache2/sites-available/owui.thegeekden.net.conf

This step should not be done and FreedomBox should do this automatically. Since FreedomBox has overwritten this file, it is fine.

Instead, you should create a file /etc/apache2/includes/owui.thegeekden.net-include.conf that should have the following content:

ProxyPass / http://192.168.0.12:3000/

Then reload apache.

As you already saw, as soon as you add a domain in FreedomBox web configuration, the TLS certificate is obtained and managed by Let’s Encrypt. So, separate management of SSL is not need.

You won’t need this step either. Outside computer will connect to FreedomBox on port 443 (HTTPS) and FreedomBox already has this port opened in firewall. Your router is already configured to forward this port to FreedomBox. FreedomBox will connect to your internal machine 192.168.0.12 on port 3000. For this, no port forwarding should be needed if FreedomBox and the local machine are in the same LAN (which you mentioned). You can confirm that FreedomBox can reach you local machine on port 3000 by running something like this on FreedomBox:

curl http://192.168.0.12:3000/

This should print the HTML page for the Open WebUI app.

Cool, Thanks, I will try that tomorrow, Have a GOOD night! :slight_smile:

1 Like

Unfortunately, this did not achieve the result we were looking for. It still goes to the FBX front page. When looking at the curl results, there was (I think) a clue as to what’s going on, please take a look at the results -

Internal (http://192.168.0.12:3000): Bepasty

External (https://owui.thegeekden.net): Bepasty

The external curl results say something about the document being moved, I think it is being redirected by plinth.

Note I did notice that the permissions and type of files in the /etc/apache2/includes/ directory had some variation here, not sure if this would affect things -
Doing a list of that directory gives me this:

$ ls -la /etc/apache2/includes/

Update ChatGPT suggested that I do the following:

:white_check_mark: Goal

Ensure https://owui.thegeekden.net loads Open WebUI from http://192.168.0.12:3000 without redirection to /plinth.

  1. Create a Clean Apache Site (Bypass FreedomBox Macros)
  2. Disable Automatic Includes from FreedomBox

Does this sound correct? Here is a link to the chat, so you can see the context and prompts: ChatGPT - Enable SSL on WebUI

Okay so I found a solution for the problem - not necessarily the way I was asking to achieve it, but I found a way to do what I needed to do, using FreedomBox.

How I did it: I set up Wireguard VPN from within FreedomBox to relay my traffic - I can now access my Open WebUI interface from anywhere on the Internet securely. Problem solved.

Oops! I was trying to debug for your setup and I realized that the fixes need to enable forwarding of all subdomain traffic never were released due to Debian freeze timeline. Until FreedomBox 25.10 or later is released, you will have do some manual editing of FreedomBox configuration files. Please add the following lines to the file /etc/apache2/conf-available/freedombox-tls-site-macro.conf:

            <IfFile /etc/apache2/includes/$domain-include.conf>
                Include includes/$domain-include.conf
            </IfFile>

Just before the </VirtualHost> line. The complete file should look like this:

<Macro FreedomBoxTLSSiteMacro $domain>
                                       
    # mod_ssl default options. See /etc/apache2/sites-available/default-ssl.conf
    <IfModule mod_ssl.c>
        <VirtualHost _default_:443>
            ServerAdmin webmaster@localhost
            ServerName $domain
            DocumentRoot /var/www/html

            SSLEngine on

            # Disable TLS1.1 and below. Client support: Firefox: 27, Android:
            # 4.4.2, Chrome: 31, Edge: 12, IE: 11 (Win7), Java: 8u31, OpenSSL:
            # 1.0.1, Opera: 20, Safari: 9. See:
            # https://wiki.mozilla.org/Security/Server_Side_TLS
            SSLProtocol all -SSLv3 -TLSv1 -TLSv1.1

            # Automatically obtained certificates from Let's Encrypt
            <IfFile /etc/letsencrypt/live/$domain/privkey.pem>
                SSLCertificateFile /etc/letsencrypt/live/$domain/fullchain.pem
                SSLCertificateKeyFile /etc/letsencrypt/live/$domain/privkey.pem
            </IfFile>
            <IfFile !/etc/letsencrypt/live/$domain/privkey.pem>
                SSLCertificateFile /etc/ssl/certs/ssl-cert-snakeoil.pem
                SSLCertificateKeyFile /etc/ssl/private/ssl-cert-snakeoil.key
            </IfFile>

            <FilesMatch "\.(?:cgi|shtml|phtml|php)$">
                SSLOptions +StdEnvVars
            </FilesMatch>
            <Directory /usr/lib/cgi-bin>
                SSLOptions +StdEnvVars
            </Directory>

            <IfFile /etc/apache2/includes/$domain-include.conf>
                Include includes/$domain-include.conf
            </IfFile>
        </VirtualHost>
    </IfModule>
</Macro>

And restart Apache after the change.

Please let me know if this works. I am currently using this workaround on my own FreedomBox.

Sunil,

TYVM! You are a Rockstar! :smiley: I will give this a try when I get a little free time to tinker, I think I will work on hardening my Open WebUI server first, just to be on the safe side…

@sunil @mtinman Wow, this is an extensive guide you’ve put together! <3 Would you mind moving an excerpt of it into the “Tips & Tricks” section of this forum? I was looking for similar instructions the other day and worry that the knowledge and effort will get lost in old threads on the support section as they move into the past.

I have moved the topic to “Tips & Tricks” section. There is also a section called “Guides” now in the FreedomBox manual where we can collect these.

1 Like